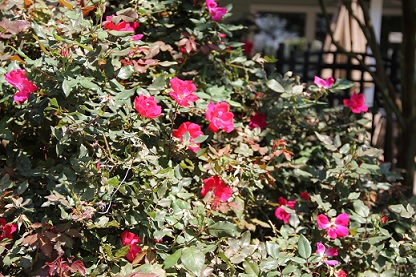
GreenSeasons
  • HOME
  • ABOUT
    • Our Company
    • Charitable Dentations | GreenSeasons
    • Clients Served >
      • Campus
      • Commercial
      • Government
      • Industrial
      • Residential
      • Testimonials
    • Bios
  • SERVICES
    • Design / Build >
      • Landscape Design
      • Landscape Installation
      • Irrigation
      • Landscape Drainage Solutions
      • Outdoor Lighting
    • Landscape Maintenance
    • Mowing Service
    • Lawn Care
    • Christmas Lights
  • CONTACT
    • Baton Rouge Office
    • Greenwell Springs Office
    • Slidell Office
  • CAREERS
  • BLOG
  • PAYMENT
  • QUOTE

Knockout roses facing extinction?

4/26/2013

0 Comments

 
Picture
Knockout roses have been around for 13 years now and we love them. In fact, knockout roses are the number one selling landscape plant in the United States. They require little care. They can handle mistreatment great. Knock out roses now come in a large variety of color. Knockout roses bloom with a vibrant show of color and have very few severe problems... until now.

knockout rose gets knocked out

You are outside admiring your landscaping when you notice something different about your knockout roses. New, long, red shoots are protruding out from your otherwise normal looking plant. The flowers have bloomed and appear gnarled. What you are looking at is the effects of the virus known as rose rosette disease. The disease will continue to spread to all other parts of the plant. The knockout rose's health will continue to degrade and it will die. 

...but wait, there's more! If that wasn't bad enough, the virus is spread by eriophyid mites. These mites are about the size of dust and simply go where ever the wind takes them. You read that right. Wherever the wind blows is exposed to the risk of rose rosette and all of their knockout roses dying. If the mites, which you can't see, land on your knockout roses and feed, they transmit the virus and your roses chance of survival drops substantially.

how to treat rose rosette

Well the short form of it is you can't treat it. Once the virus has entered the knockout rose, its there to stay. Your only chance of saving the plant is to catch it early remove the infected part of the plant by cutting well below the infected area, cutting into the healthy part of the plant. If you didn't notice the disease until it has infected the entire plant, here's what you do. Uproot the plant and dispose of it. Sorry, but there is no other options to save it.

Unfortunately, knockout roses are not exclusively the only rose the rose rosette damages. There are many other varieties susceptible to the virus so keep an eye out. All roses with the virus will display the same symptoms as the infected knockout roses. 
0 Comments

How to change the oil in a lawnmower

4/19/2013

0 Comments

 
Picture
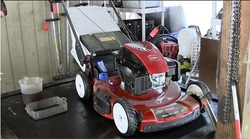
We put together a quick video on how to change the oil in a lawnmower. It is pretty simple, but a lot of people don't really know how to change the oil on your average push mower. Follow the instructions for you particular brand of mower, but the rule of thumb is to change the oil after 30 hours of use. Let me know any questions you have in the comments section.

mower oil change video

0 Comments

How to grow watermelons at home

4/12/2013

1 Comment

 
Watermelon will grown on a large vine sprawling out from the seed you plant. The plant loves heat and sunlight. In southern Louisiana this means planting watermelon seeds in late March to Mid April for best results. There are two beautiful things about growing watermelon. First, once they start growing, they need very little attention. Second, they are great to eat!


1


2

items to grow watermelon

  • Watermelon seeds (pick a variety you like)
  • A sunny spot of land
  • Loamy, well drained soil
  • Leather Gloves
  • Tools for tilling soil (shovel, pitchfork, hoe)
  • Tool for digging small holes (spade, hand)
  • Water

steps to planting watermelon

Pick a spot. Make sure the area has full sun for at least 6 hours a day and good soil. If it doesn't have good soil, you can always add some new soil or compost.

Time for some landscaping work. You can either build a gardening box or make crop rows. I will cover making a crop row today, but both choices work the same for growing watermelon.

Picture
3


4


5


6


7


8
Break up and remove any plants growing on top of the crop area. Till the soil and making sure to break up clumps of soil. If you have trouble doing this or are doing a large area, you can look into renting a gas powered tiller. Make Mounds of soil using your hoe. Space these three to six feet away from the next row.The raised soil will allow water to drain and air reach the plants roots. The lower areas retain more water also.


Level off the tops of your mounds and use either your spade or your hand to make a narrow one inch deep hole for the watermelon seed. Put a few seeds in each hole and pull soil over the top of the hole until it is even with the rest of your mound. Do not press or pack in the soil on top of your seed. Instead, water the newly planted landscape bed using either your finger on the tip of the hose or a setting for your nozzle that imitates rainfall.


For the next week, keep the soil around the seeds damp. About of a week or so later you will see signs of life. Get rid of any plants that look far worse than the others. This will allow for more nutrition for the strong plants. When your new watermelon plants are about 5 inches, add some mulch directly next to the young plants to keep away weeds. Make sure to not cover up your plant. I foresee a very difficult time for you if your plant isn't getting sunlight.

You are in business once you start seeing flowers on your watermelon vines. You can now water your plants twice a week, but only if the soil is dry. If you have gotten a lot of rain in your area, chances are your plants have had enough to drink. Matter of fact, watermelons don't like having water around them. Excess water kind of leads to disease, fungus and sometimes death for the melons. If your watermelons are always wet, you can lay out a 2X4, a piece of tarp or flat rocks and sit your watermelon and its vines on top of them.

Keep your garden free of weeds regularly so they don't block out the sun and consume the nutrients from your watermelons. Also, if you notice your watermelons looking discolored or weird  you may have a fungus or bug problem. If you notice your plants or fruit missing, you have an animal or a people problem.


If you plant your melons in April, they will probably be fully grown by August. Smaller melons will take less time while larger melons take longer. To check if they are done, flick the melon with your finger and if it makes a lower pitch sound, it is probably ready. You can also check the bottom of the melon. If the bottom is yellow, it should also be a good sign it is ready. Do not water your watermelon for five to seven days before harvesting. This will give a better sugar to water ratio in your melons so they will taste great! Cut the watermelon from the vine and enjoy your hard work.


If you have any questions, please ask in the comments section below. We would love to hear from you.
1 Comment

How to cheaply make a compost box

4/5/2013

2 Comments

 
Picture
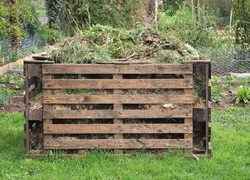
Compost is great for vegetable gardens, flower beds, potted plants, refreshing your grass or just to add to just about anything dealing with landscaping at your home.  You could buy a compost box or compost bin from a store or online, but why would you? Here is a way to make one that will take very little time and is nearly free.

what you will need to make a composting bin

Picture
  • 4 pallets - most warehouses stores will give these away for free
  • Long wood screws
  • Electric or battery operated drill
  • Extension cord (if you are using an electric drill)
  • About an hour

how to build a composting box

  1. Pick out a spot close to where you will want to use your compost. Generally this will be by your garden. Please keep the compost box at least five feet away from your home to prevent unwanted insects.
  2. Bring all of your supplies next to the location so you can build it there.  It will be very heavy so make sure you build it where you want it to stay.
  3. Stand two pallets up with two of the side edges flush against each other.
  4. Drill in two wood screws per cross beam (the thick piece of wood) to connect the two pallets to one another. At least six screws per corner.
  5. Place another pallet next two one of the open edges and connect it in the same way.
  6. Repeat this for both sides of the last pallet.
  7. Victory! Your compost box is built. Time to start composting. 

help with composting

The spaces between the boards of the pallets will help air and water to reach more of the composting soil. Air and water are needed for the bacteria to break down the material into compost. Lack of air can lead to smells.
Do not add protein to the compost pile. It will attract animals and will add a terrible stench.
Try to keep a 50/50 ratio of brown compost material(leaves, dirt) and green compost material (discarded vegetables, grass clippings, egg shells, fruit skins)
If you want your compost to occur more quickly, be sure to turn your compost with a pitchfork and add some earthworms you find.
If you find that you have too much compost, I bet you have a neighbor who could really use some.
Composting not only creates great soil for you, it also reduces what we send to landfills. Do your part to keep the earth green.
service request
2 Comments
    Picture

    Author

    Charlie Casselberry

    RSS Feed

    Archives

    November 2022
    October 2022
    September 2022
    August 2022
    March 2022
    January 2022
    December 2021
    October 2021
    September 2021
    August 2021
    July 2021
    June 2021
    May 2021
    April 2021
    March 2021
    August 2020
    July 2020
    June 2020
    May 2020
    April 2020
    March 2020
    February 2020
    June 2019
    May 2019
    April 2019
    March 2019
    February 2019
    January 2019
    December 2018
    November 2018
    October 2018
    September 2018
    August 2018
    July 2018
    June 2018
    May 2018
    April 2018
    March 2018
    January 2018
    December 2017
    November 2017
    October 2017
    September 2017
    August 2017
    May 2017
    June 2016
    April 2016
    December 2015
    November 2015
    October 2015
    August 2015
    July 2015
    June 2015
    May 2015
    April 2015
    March 2015
    February 2015
    January 2015
    December 2014
    November 2014
    October 2014
    September 2014
    August 2014
    July 2014
    June 2014
    May 2014
    April 2014
    March 2014
    February 2014
    January 2014
    December 2013
    November 2013
    October 2013
    September 2013
    August 2013
    July 2013
    June 2013
    May 2013
    April 2013
    March 2013
    February 2013
    January 2013
    December 2012
    November 2012
    October 2012
    September 2012

    Categories

    All
    Aeration
    Allergies
    Ants
    Azalea
    Bed Bugs
    Butterflies
    Compost
    Diseases
    Diy
    Drainage
    Fall
    Fertilization
    Flowers
    Fountain
    Fruit
    Fundraising
    Fungus Control
    Gardener
    Gardening
    Gutter Cleaning
    Holiday Lighting
    Home Care
    Homegrown Food
    Horticulture
    Hurricane
    Indian Hawthrones
    Indoor Plants
    Industrial
    Irrigation
    Landscape Architecture
    Landscape Bed Cleanup
    Landscape Design
    Landscape Lighting
    Landscape Maintenance
    Landscaping
    Lawn Care
    Louisiana Super Plant
    Mechanic
    Mosquito Control
    Mowing
    Mowing Equipment
    Outdoor Events
    Overseeding
    Palms
    Pest Control
    Pets
    Plant Health
    Planting
    Podcast
    Pools
    Pressure Washing
    Pruning
    Roaches
    Rocks
    Rodent Control
    Roses
    Rye Grass
    Safety
    Shrub
    Sod
    Sports
    Spring
    Sprinkler
    Summer
    Termites
    Top Dressing
    Travel
    Tree Work
    Tree Work
    Tropicals
    Vegetables
    Weather Proofing
    Weeds
    Winter
    Winterize

    RSS Feed

Picture

Contact

225-752-2333
wecare@greenseasons.us

Services

Landscaping
Irrigation
​Mowing

About

About Us
Markets
Brands
​Site Map

Locations

GreenSeasons
Baton Rouge Office
11628 S Choctaw Drive, Suite 227
Baton Rouge, Louisiana 70815
Review Us!
Greenwell Springs Office
14461 Frenchtown Road
Greenwell Springs, LA  70739
Slidell Office
56010 Highway 433
Slidell, Louisiana 70461
Review Us!
© 2020 GreenSeasons
  • HOME
  • ABOUT
    • Our Company
    • Charitable Dentations | GreenSeasons
    • Clients Served >
      • Campus
      • Commercial
      • Government
      • Industrial
      • Residential
      • Testimonials
    • Bios
  • SERVICES
    • Design / Build >
      • Landscape Design
      • Landscape Installation
      • Irrigation
      • Landscape Drainage Solutions
      • Outdoor Lighting
    • Landscape Maintenance
    • Mowing Service
    • Lawn Care
    • Christmas Lights
  • CONTACT
    • Baton Rouge Office
    • Greenwell Springs Office
    • Slidell Office
  • CAREERS
  • BLOG
  • PAYMENT
  • QUOTE